Showing posts with label Tutorial. Show all posts

Friday, June 22, 2012

{How to} Make an awesome alien headpiece

Photobucket

Last week Miss TikiBoo had her school disco.  The theme was Aliens.  I was initially a little stumped, until I found this website: 7 Layer Studio, where an awesome mum made alien costumes for her entire family last Halloween.
The headpieces looked so effective, so I based my idea on hers and came up with this.  We had so many comments about it that I decided I'd share how to make one.  It was really quite simple - no sewing required!
Photobucket
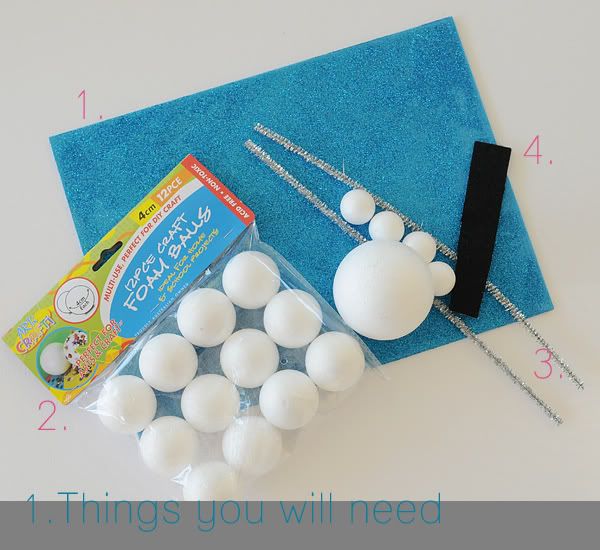
Step 1. You will require the following items, most can be purchased at your local el cheapo shop or Spotlight.
1. Glitter foam
2. Polystyrene balls in a couple of sizes
3. Pipecleaners
4. Stick on felt (although a black marker will also work)
You'll also need elastic, scissors and probably a hot glue gun.

Photobucket
Step 2. Find the centre of your foam and roughly draw the shape of your design.

Photobucket
Step 3. Fold the foam in half (don't press the centre fold) and cut both sides together so you get a nice symmetrical design. You will need sharp scissors for this.

Photobucket
Step 4. Unfold, and neaten up your cutting.  Hold against your child's head, and check that you are happy with your shape, adjust if required.

Photobucket
Step 5. Cut out a hole in the centre for your big eye (or a couple of smaller eyes if you prefer).  I was lucky enough to get this one almost perfect, unfortunately the one on the actual costume was cut too big and needed a lot of glue to remedy!

Photobucket
Step 6.  Push your polystyrene ball in from the back.  The foam does stretch a bit, however don't force it or it will rip.

Photobucket
Step 7. Using either a circle cut from stick on foam, or a black marker, add a pupil to your eyeball/s.  Glue in place from the rear.

Photobucket
Step 8.  I had to use a lot of glue, which looked very messy so I glued some offcuts over the glue, both on the front and back.

Photobucket
Step 9. Glue your small eyeballs onto the pointy ends.

Photobucket
Step 10. Carefully make a small incision and thread elastic through.  Be super careful during this step so you don't rip the foam.  I glued some more offcuts over the elastic so it couldn't be seen from the front.  These sit perfectly above her ears and look like pointy spock additions.

Photobucket
Step 11. Add your final details - we added eyebrows, and some earrings made from our pipecleaners. Whip up an alien costume (with the help of Grandma if you're running out of time!), and you have an awesome Alien!


Photobucket

If you have stopped by, it would be lovely if you could leave a comment or just say hello so I know that you've been here. Thank you!

Wednesday, October 26, 2011

{Home on Wednesday} - Potted Daisies

Daisies in galvanised buckets

Way back in 2009, we travelled to the south of France, along the French Riviera.  Somewhere along the way, by a shop doorway in one of the many villages we wandered through, I saw a daisy plant in a galvanised iron tub.  It's been an image that stayed with me the past few years, so I finally decided it was time I had my pot of daisies.

The Queenslander split front staircase at our home starts with two not particularly attractive concrete slabs.  Completely uninspiring, and just begging for some attention and some sort of makeover.  It was here I decided my potted daisy should go.

But, hey, why stop at one!  I now have eight tubs and pots in various sizes, evoking those memories every time I walk up the stairs.

And what's the best thing about daisies?  According to Miss TikiBoo, they are perfect for picking!

bunch of daisies

Potted daisies in galvanised pots

Daisy flower


Here are some tips if you like this idea:

  • Look around for different sized pots and buckets.  I visited several different nurseries and hardware stores to source mine.  They cost $9 - $15 each. My large tubs are actually designed to be tubs to hold ice and drinks, the medium pots are actually buckets and the smaller pots are from Ikea, similar to this.
  • Make sure you drill holes for drainage in the base of each pot or bucket prior to planting.
  • I selected Federation Daisies (Yellow - "Surfer Girl"; Pink - "Summer Pink" and a traditional white).  I also have a potted lavender in the arrangement.  Herbs would suit as well, and would add to the "cottage garden" feel.
  • Daisies like a sunny spot, but will dry out quickly so don't forget to water regularly.
  • If you "dead-head" (ie: cut off the withering flowers) your daisy plants regularly, it encourages your plant to continue blooming.


What have you done in your garden recently?

This post is the first in a new series I'm introducing to my blog "Home on Wednesday". Look out for my At Home posts each week to see how things are progressing around our home and garden!

{Primp}

If you have stopped by, it would be lovely if you could leave a comment or just say hello so I know that you've been here. Thank you!

Friday, December 3, 2010

A Cookie Cutter Christmas

I wanted to keep things simple this year, well, as much as possible. No glittery baubles, no tinsel, no lights...so far so good!

The other day I found some beautiful porcelain star shaped decorations, and decided to have a go making something more child friendly.These were so quick and easy to make. They're not "perfect", but when you're making them with a nearly-five-year-old, it's the love that counts, right?

What you need:
Air drying clay. We used DAS.
Ribbon or string
Stamp (optional)
Cookie Cutters
Rolling pin
Airing rack
Fine sand paper

Cut off a section of clay. We worked with a quarter of a pack at a time.
Roll to desired thickness. Anywhere between 3-5mm is best, the thicker they are the longer it takes to dry.Use your cookie cutters to press out shapes. Don't forget to cut out a hole for hanging.

If you like, use a stamp on the front. We used a merry christmas. I did try using red ink, however, I didn't really like the effect.


Leave to dry, at least 24 hours but could be longer in wet weather.


Once they are totally dry you can sand the edges smooth. They can then be painted, drawn on with Sharpie markers, varnished or left plain.

Attach your ribbon and hang, or give as gifts. (We gave a star to each of the kindy teachers, I wrote Love Alexandra 2010 in sharpie on the back.)

Here's one we prepared earlier...


PS - I just discovered my friend Simone blogged similar earlier this week, you can check out her decorated ornaments over at Life as a Goff.

If you decide to make some, please blog and leave a link!

Sunday, June 21, 2009

Recession Buster Jeans

jeans02

I'm sure most of us have a pair of jeans hanging around which fit around the tummy - those adjustable waists rock - but are too short in the legs. Or maybe you got lucky like me and found a pair at k-mart reduced to $3! Here is a way to get an extra season from the jeans, or simply a way to create a very cool addition to a little wardrobe and use up fabric scraps. For a boy, add a cuff instead of the ruffle.

tshirtgiveaway-0011

1. Split open the seam of the jeans, usually the inner seam - whichever one isn't top stitched. I usually go as far as the pocket. Cut off the hem.

tshirtgiveaway-00222. Open out the seam and press. (Now, I missed a few photos of the next steps here, sorry!)


tshirtgiveaway-0062

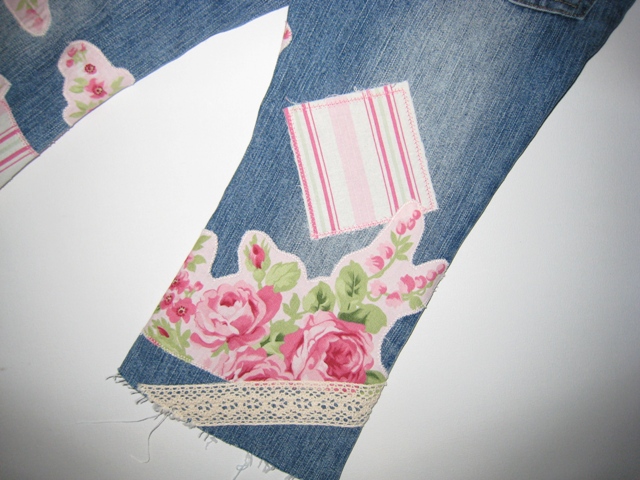
3. Sew on patches! However you like, there are no limitations. I back mine with vliesofix (double-sided iron on sticky stuff!) and iron them all on before I sew, but you could do each individually. The type of stitch you use doesn't matter either, it depends how much you want fraying. Experiement with some decorative stitches!

tshirtgiveaway-0032

4. Embelish with whatever else you like. Lace, buttons, patches. Anything goes!

tshirtgiveaway-0092

5. Once you're happy with your patching, turn inside out then stitch and overlock your seam back together, try and stitch where the original seam was.

tshirtgiveaway-0102

6. Make ruffles!

tshirtgiveaway-0132

7. Pin ruffle on, then stitch and overlock.

tshirtgiveaway-0152

8. Turn rightside out and top stitch the ruffle in place.

jeans019. Find uncooperative model!

If you do make these, I'd love to see photos!

PS:

Here are a few more tutorials for embellished jeans!

Quality Time - Hippy Chic

That Darn Kat - Ribbon Jeans Tutorial

sig
Related Posts with Thumbnails