Showing posts with label Sewing. Show all posts

Friday, June 22, 2012

{How to} Make an awesome alien headpiece

Photobucket

Last week Miss TikiBoo had her school disco.  The theme was Aliens.  I was initially a little stumped, until I found this website: 7 Layer Studio, where an awesome mum made alien costumes for her entire family last Halloween.
The headpieces looked so effective, so I based my idea on hers and came up with this.  We had so many comments about it that I decided I'd share how to make one.  It was really quite simple - no sewing required!
Photobucket
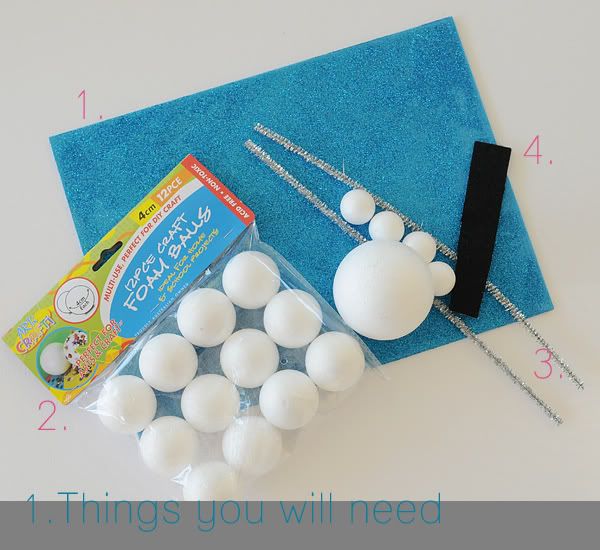
Step 1. You will require the following items, most can be purchased at your local el cheapo shop or Spotlight.
1. Glitter foam
2. Polystyrene balls in a couple of sizes
3. Pipecleaners
4. Stick on felt (although a black marker will also work)
You'll also need elastic, scissors and probably a hot glue gun.

Photobucket
Step 2. Find the centre of your foam and roughly draw the shape of your design.

Photobucket
Step 3. Fold the foam in half (don't press the centre fold) and cut both sides together so you get a nice symmetrical design. You will need sharp scissors for this.

Photobucket
Step 4. Unfold, and neaten up your cutting.  Hold against your child's head, and check that you are happy with your shape, adjust if required.

Photobucket
Step 5. Cut out a hole in the centre for your big eye (or a couple of smaller eyes if you prefer).  I was lucky enough to get this one almost perfect, unfortunately the one on the actual costume was cut too big and needed a lot of glue to remedy!

Photobucket
Step 6.  Push your polystyrene ball in from the back.  The foam does stretch a bit, however don't force it or it will rip.

Photobucket
Step 7. Using either a circle cut from stick on foam, or a black marker, add a pupil to your eyeball/s.  Glue in place from the rear.

Photobucket
Step 8.  I had to use a lot of glue, which looked very messy so I glued some offcuts over the glue, both on the front and back.

Photobucket
Step 9. Glue your small eyeballs onto the pointy ends.

Photobucket
Step 10. Carefully make a small incision and thread elastic through.  Be super careful during this step so you don't rip the foam.  I glued some more offcuts over the elastic so it couldn't be seen from the front.  These sit perfectly above her ears and look like pointy spock additions.

Photobucket
Step 11. Add your final details - we added eyebrows, and some earrings made from our pipecleaners. Whip up an alien costume (with the help of Grandma if you're running out of time!), and you have an awesome Alien!


Photobucket

If you have stopped by, it would be lovely if you could leave a comment or just say hello so I know that you've been here. Thank you!

Thursday, November 3, 2011

A November giveaway

Photobucket

I do believe I promised another giveaway. So, here it is. Two sweet craft books - Pretty Little Potholders and Pretty Little Cosies. Plus some assorted fabric in some of my favourite patterns and colours to make one of these patchwork delights, and a handful on buttons to embellish.

If you're not in any way crafty inclined, this would make a lovely gift for a friend or family member who is.

All you need to do is leave a comment. If you also want to follow me, join my pinterest, like me on facebook, retweet the giveaway, pay my bills and do my ironing, I'd be thrilled as well. But the comment is the only prerequisite, otherwise how will I know you've entered?!

This package is all wrapped up and ready to post before I head off overseas...and because I'm heading over to the USA, I'm going to let this is open to anyone in either Australia OR the USA (providing I can figure out the postal system!).

Entries close next Thursday, November 10th. 5pm Brisbane time.

If you have stopped by, it would be lovely if you could leave a comment or just say hello so I know that you've been here. Thank you!

Friday, August 12, 2011

Zip it.

Photobucket

Yes. I'm scraping the bottom of the barrel with this one! I'm running out of inspiration, already. Hopefully we will have a lovely weekend and I can get out and about with the camera.

Mum and I went shopping yesterday, and picked up this lovely loot (please tell me I'm not the only one who gets excited about shopping for haberdashery?!). I guess I'm going to need to conquer my fear of sewing in zips!


Wednesday, August 10, 2011

I'm baaaaaccckkk...

Phew. Blogging hiatus is hopefully over. Photos have been taken, and not only that, sewing has been started.

I'm stitching up a few pretty items for summer. Here's a sneak preview:


Tuesday, July 26, 2011

That thing I said about quilting...

About how it skips a generation?

Photobucket

Here is proof. I cut and sewed these squares a long time ago. As in, somewhere around 1990, I think. I was living out west, working as a governess, and living in a cottage off the main house with no TV, let alone a computer! The kids I was teaching wanted to make cushions, then I got a bit carried away cutting up a pile of scraps and making squares. This is as far as I got, and they have sat in a bag for the past 20 odd years. Maybe now I'll sew them together and make something, even though I'm not really fond of them and would have preferred something a bit more random.

Look! Liberty! Why on earth did I cut up Liberty for this? I think I'll unpick those and use them for something else.

Photobucket

These are the absolute rejects. WHAT was I thinking?

Photobucket

Especially this one. The paisley was a pair of shorts I had in year 11. Really.

Photobucket

Does anyone else have extreme unfinished projects like this, that have been sitting around for more than 20 years? Do you ever think you will get them finished?


Thursday, April 15, 2010

More Liberty Love


I've had this pale blue shirting linen for a while, and finally found something to do with it. Trimmed in Liberty Mauvey fabric it will be a sweet dress for next summer. I'm happy with this one for a rather cobbled together effort, especially the extra details like the tiny covered buttons on the sleeves.


Wednesday, April 7, 2010

For the love of...Liberty

click to enlarge

Some of you may already know about my little obsession with Liberty fabric. It's always been something I have loved, but I've never really been able to justify the cost - but things change when you have a daughter!

I have a couple of projects involving liberty fabric which are at the stage of needing to be hemmed, but in the meantime, here's a sweet little outfit Grandma made for Miss TikiBoo last year. It *just* still fits her, though I don't think she will be able to eat very much while wearing the skirt!

This fabric actually has a history. It was the first liberty I ever purchased, about 20 years ago! I made it into a blouse, which I never really wore, so it stayed in the wardrobe for a few years until I cut it up and made a cushion cover. When I removed the cover, it was a little worn and weary, with patches of mildew, but there was certainly enough useable fabric to be more useful than a tatty old cushion. I'm certain the fabric was waiting for me to come along and find it a new home. Liberty does that, you know...
Last year, when I purchased the Oliver + s Sunday Brunch pattern, I had the inspiration to repurpose some of it as trim on a lightweight denim. Maybe I'm a little biased, but I think Grandma did a lovely job.

Covered buttons:


Inside the collar:


Cuffs and inside the pockets (the cuffs are actually meant to be turned up):


It will be sad when this sweet suit no longer fits! I'm not sure if I should find it a new home or keep it for the day I have a granddaughter of my own.

If you're a fan of Liberty fabrics, I'd love to see what you've created, leave me a comment with a link to your blog!

Monday, March 29, 2010

Sweet summer blouse

Another of my sewing attempts. This one was a pattern of my own creation. It does need a bit of tweeking before I cut up the Liberty I plan to make it in!
It's a light cotton lawn, easy to wear and perfect for the Brisbane summer, or can be worn over long sleeves for summer.
Miss TikiBoo was happy with it, although as usual it wasn't pink enough!

Sunday, June 21, 2009

Recession Buster Jeans

jeans02

I'm sure most of us have a pair of jeans hanging around which fit around the tummy - those adjustable waists rock - but are too short in the legs. Or maybe you got lucky like me and found a pair at k-mart reduced to $3! Here is a way to get an extra season from the jeans, or simply a way to create a very cool addition to a little wardrobe and use up fabric scraps. For a boy, add a cuff instead of the ruffle.

tshirtgiveaway-0011

1. Split open the seam of the jeans, usually the inner seam - whichever one isn't top stitched. I usually go as far as the pocket. Cut off the hem.

tshirtgiveaway-00222. Open out the seam and press. (Now, I missed a few photos of the next steps here, sorry!)


tshirtgiveaway-0062

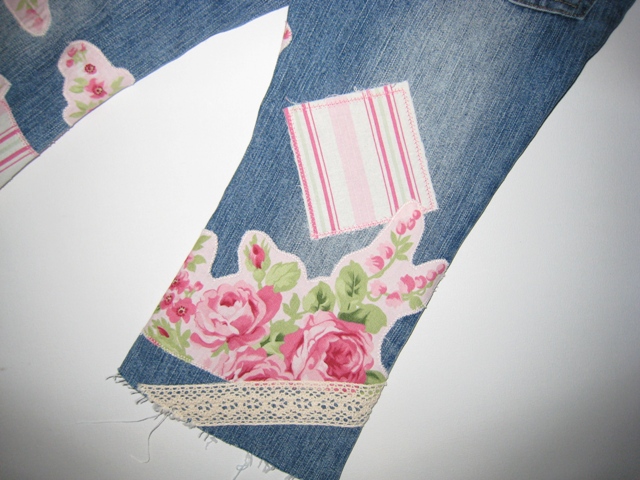
3. Sew on patches! However you like, there are no limitations. I back mine with vliesofix (double-sided iron on sticky stuff!) and iron them all on before I sew, but you could do each individually. The type of stitch you use doesn't matter either, it depends how much you want fraying. Experiement with some decorative stitches!

tshirtgiveaway-0032

4. Embelish with whatever else you like. Lace, buttons, patches. Anything goes!

tshirtgiveaway-0092

5. Once you're happy with your patching, turn inside out then stitch and overlock your seam back together, try and stitch where the original seam was.

tshirtgiveaway-0102

6. Make ruffles!

tshirtgiveaway-0132

7. Pin ruffle on, then stitch and overlock.

tshirtgiveaway-0152

8. Turn rightside out and top stitch the ruffle in place.

jeans019. Find uncooperative model!

If you do make these, I'd love to see photos!

PS:

Here are a few more tutorials for embellished jeans!

Quality Time - Hippy Chic

That Darn Kat - Ribbon Jeans Tutorial

sig
Related Posts with Thumbnails